Jun. 22, 2025
.dotfiles or… (.)²files?
- Using Git + Github, & tracking dotfiles with an alias.
# 1. Create a bare Git repo to track dotfiles
git init --bare ~/.dotfiles

# 2. Create an alias to simplify dotfiles management.
# Tells (/usr/bin/git) to link the git alias directory you just created to your real .config/
alias dotfiles='/usr/bin/git --git-dir=$HOME/.dotfiles/ --work-tree=$HOME'

# 3. Hide untracked files in ~/ from cluttering "git status"
dotfiles config status.showUntrackedFiles no
Setup & communicate with this repo via ssh, authenticating with a local private key.
Apr. 22, 2025
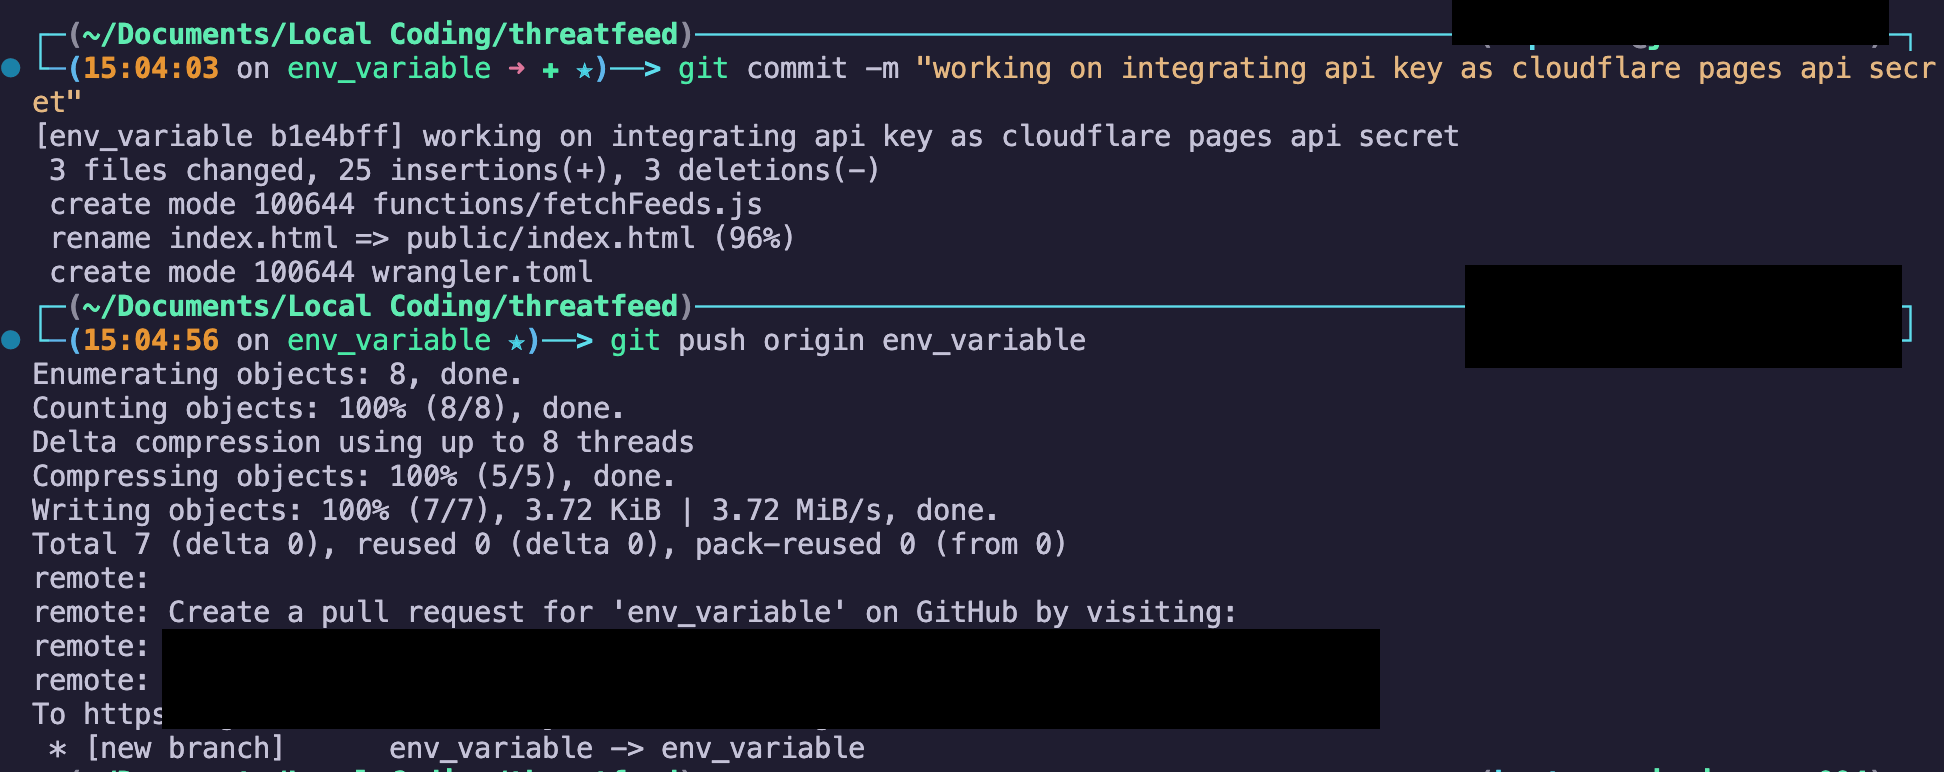
Smol Objective: Revisiting branching, checkout’s, and stashing!
Via: creating a new local branch to save recent experimental changes on, publishing the branch to a remote Github repository, and then switching back to the functional, remote main branch locally. Oh, and stashing changes as I switch between the two to compare.
- Branching & Checkouts
# Check the current status (ensure connected to remote origin)
git status

# checkout - create (argument -b) and switch to a new branch.
git checkout -b branch-name

# Stage all changes at the HEAD of this new branch (or select specific files/changes by specifying them, instead of '.')
git add .

# Commit changes
git commit -m "Describe changes here"

# Publish changes to upstream branch on Github
git push origin branch-name
- in the wild:
Apr. 13, 2025
Just a smol lil guide for myself to set up a minecraft server from scratch, as I cannot count the number of times I’ve had to re-learn this when I migrate from server to server.
I’ve opted for services that should (for the most part) be supported long-term and are relatively secure & lightweight. However, as any good netizen should do, please take my advice with a granule of sugar…
Feb. 27, 2025
Here lies the ramblings of a madwoman; bumbling her way around in the darkness in an attempt to understand the wide world of websec…
… in the absolute broadest of strokes:
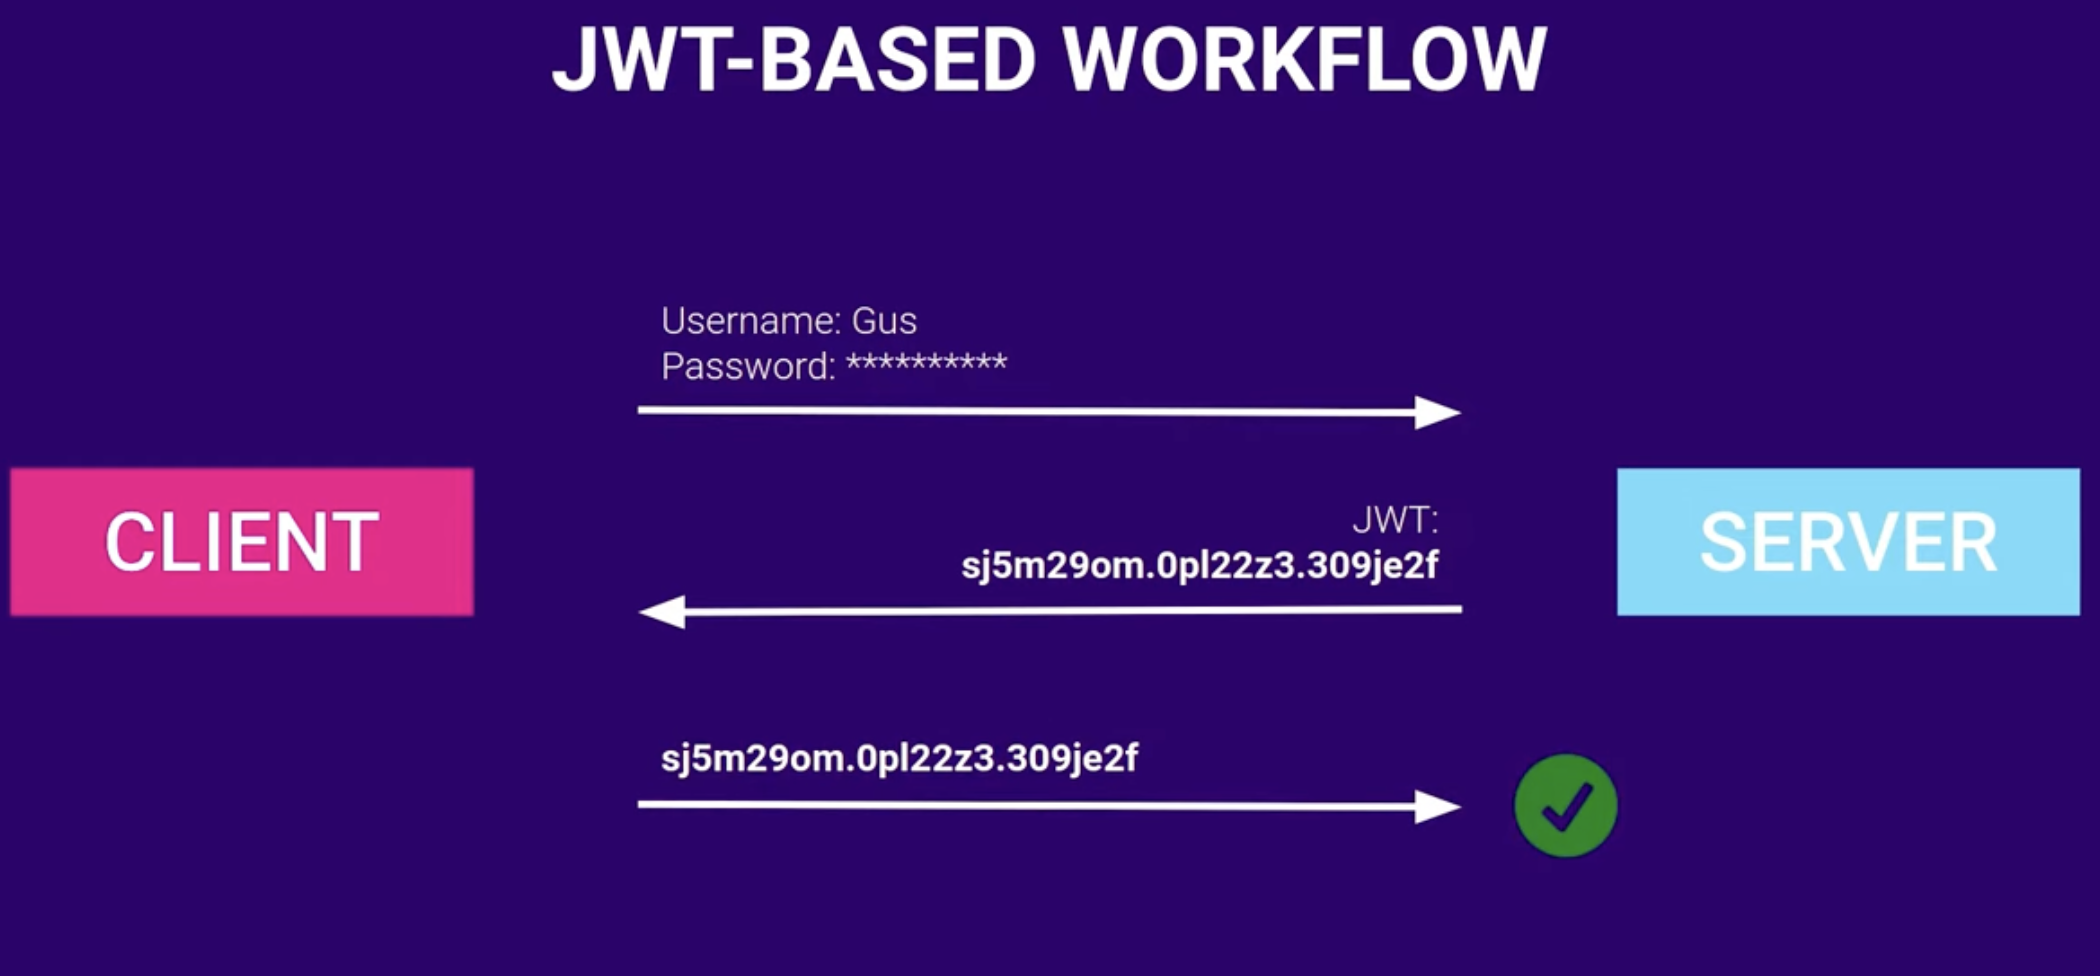
- Token-based (
JWT):
- Authentication state is stored on the client (local/session storage) in the form of a token.
- Session-based:
- Authentication state is stored on the server’s database.
Now, let’s go a little deeper, shall we?
- JSON Web Tokens (JWT)
Jan. 12, 2025
just a lil guide for my future self when i inevitably forget this again (and it’s probably still wrong oops-)
- Steps:
- Find the commit you want to revert to & copy its hash:

- Return to your open project:
for me, i was working with a locally-cloned copy in VScode, connected to the remote repo’s main branch, and was up to date with all of the changes made.
Jan. 8, 2025
and now - to the story of how this blog was born!
(it’s nothing special, but I thought I’d document it for myself when i inevitably forget how i did it in the future, as well as any other wandering lost souls out there!)
i’ve been meaning to re-jig my tech blog for a while now. for the last year and a bit, I experimented with the static site generator (SSG) jekyll. jekyll is essentially a tool built in ruby that combines blog posts (typically written in markdown, .md files) with themes/config files to generate browser-renderable code (HTML, CSS and JS).
Dec. 26, 2024
- debian 12 container install inside proxmox
- `sudo apt update && sudo apt upgrade -y
- network settings: If your router supports subnets/VLANs, connect this to the isolated VLAN. within proxmox, assign static IP not in use and point to your router’s gateway.![[Screenshot 2024-07-08 at 8.40.32 PM.png]]
- install nginx on debian -
sudo apt install nginx -y
- create a file for website settings: `nano /etc/nginx/sites-available/mywebsite
server {
        listen 80 ;
        listen [::]:80 ;
        server_name juni-mp4.org ;
        root /var/www/juni-web ;
        index.html index.htm index.nginx-debian.html ;
        location / {
                try_files $uri $uri/ =404 ;
        }
}
The listen lines tell nginx to listen for connections on both IPv4 and IPv6.
The server_name is the website that we are looking for. By putting landchad.net here, that means whenever someone connects to this server and is looking for that address, they will be directed to the content in this block. root specifies the directory we’re going to put our website files in.
Dec. 25, 2024
burn it all down… or?
Ahh, a tale born from the first time that I dipped my toes into the weird, wide and wonderful world of distro-hopping. Because sometimes, instead of building it all from scratch again (like so many of us are fond of doing), bringing your old config, notes of a previous home, with you is desirable. Because don’t lie - we won’t get those hours spent tweaking shell configs to look just how we like it back.
Dec. 24, 2024
a single breath echoes into the abyss
hello, world. it’s been a while.
Dec. 23, 2024
- so, how did we get here? :see_no_evil:
git stores all historical changes to a repo in a PACK file inside the hidden .git folder. This allows restoration of previous repo states in the future.
However, if you upload files like binaries, photos or videos, this file gets VERY large, even if you delete them in a future commit.
- enter: git-filter-repo
Luckily a tool exists called git-filter-repo that you can download and use (python script) to analyse your PACK file, and filter out any unwanted bits (e.g. file extensions, paths, etc.). This can dramatically reduce the size of the PACK file.
Nov. 13, 2023
Hi all! After a long and troublesome battle against the gods of networking and the intricacies of pfSense, I have
finally developed a process (that I understand, at least) for initialising an ETHX port to pass VLAN traffic that is
tagged externally by a switching device (in my case, a USW-PRO 48PoE UniFi managed
switch).
In the hope that this can be of use to others out there, I have written up my process for doing so below. But first,
here is a contextual network diagram for my setup:
Aug. 4, 2023
… & pulling files from an external SSD &/or an internal HDD. Yes, this was… interesting.
- So… why did I write this?
My primary objective was to setup a home lab, which could do the following things:
-
run LXCs of various linux distros (Kali via external install, and CentOS via Proxmox template) [done]
-
run a Plex Media server, accessing both external SSD and internal HDD data [done]
-
Setup a VPN for use in the server [done]
Jul. 10, 2023
~ Using TP-Link TL-WN722N ~
The GUI way of adding a USB device to a Proxmox VM didn’t work for me when using a USB network adapter (the device id was not showing up when trying to add to the VM via the GUI), so here is a simple manual workaround.
- Steps:
-
Plug in your desired USB device into the physical machine you’re running Proxmox on.
-
Using the CLI on the Proxmox host machine (recommended to use ssh/webGUI CLI), list all connected USB devices with lsusb:
Jun. 8, 2023

Here is a little guide from a nightmare I encountered whilst trying to perform a maintenance update on a pfSense router… I hope my pain and suffering can help someone else :’).
DO NOT MAKE MY MISTAKE - CREATE A BACKUP FOR YOUR PFSENSE SETTINGS AND STORE IT LOCALLY BEFORE UPDATING!!!!.
pfSense DOES create a backup of settings before updating, but accessing it can be problematic to say the least… (see below)
Feb. 15, 2023
Here’s a quick little rabbit-hole of upgrading ESXi clients, and a crash course on TPMs and their equivalents! 💛
- TPM/fTPM/Intel PTT Rundown
- Trusted Platform Module - a secure crypto-processor that generates, stores, and limits the use of cryptographic keys required to access system files!!!!! (reference).
The traditional TPM is a physical security & encryption-focused chip on the motherboard, but can also be built into the firmware of the computer’s CPU, which are notably AMD Firmware TPM (fTPM) and Intel Platform Trust Technology (PTT).
Jan. 23, 2023
- Pre-requisites:
-
Have a working Splunk instance (Splunk Enterprise, in my case) to connect to. There are plenty of tuts for this online.
-
Have installed a universal forwarder on the endpoint that you want to monitor (see here, an excellent post which will get you most of the way through setting up Splunk to analyse Suricata & pfSense logs)
Note: There are some steps specific to my use case, which are marked accordingly with [OPTIONAL]. These can be ignored if you’re just trying to configure a universal forwarder to send data to multiple indexes in Splunk.
Aug. 3, 2019
Hugo is an open-source project and lives by the work of its contributors. There are plenty of open issues, and we need your help to make Hugo even more awesome. You don’t need to be a Go guru to contribute to the project’s development.
Jul. 1, 2019
Hugo is a fast and modern static site generator written in Go, and designed to make website creation fun again.
Jan. 1, 0001
NEED TO ADD nginx WEBSERVER SETUP PORTION INSTALL
'
THE BELOW SCRIPT SETS UP THE FOLLOWING ON A DEBIAN BASED DISTRO:
- SSH ACCESS + AUTHORIZED KEYS
- ufw

LINES TO CHANGE BASED ON ENVIRONMENT

line 65 - ssh key (insert yours)
lines 71 onwards --> uncomment to install tailscale and set up as an exit node/subnet router, need to replace with desired IP etc.

'

# first, run manually to create a root acc without pw
sudo passwd -d root

su root


#!/bin/bash

## THE BELOW ASSUMES YOU ARE RUNNING AS ROOT USER.

## --------------------------
## INSTALL REQUIRED PACKAGES
## --------------------------


sudo apt update && sudo apt -y upgrade && sudo apt -y autoremove && sudo apt clean


## ---------------
## Setup UFW
## ---------------

ufw limit 22/tcp
ufw limit 22/tcp6
ufw enable
ufw logging on
ufw status


## ---------------
## Harden SSH
## ---------------

sudo sed -i -e 's/#PasswordAuthentication yes/PasswordAuthentication no/' \
        -e 's/PasswordAuthentication yes/PasswordAuthentication no/' \
		-e 's/#PermitRootLogin prohibit-password/PermitRootLogin no/' \
        -e 's/UsePAM yes/UsePAM no/' /etc/ssh/sshd_config


## tell ssh where to look for known keys (universal)
sudo touch /etc/ssh/authorized_keys
sudo echo "AuthorizedKeysFile /etc/ssh/authorized_keys" >> /etc/ssh/sshd_config

## remove any conflicting settings for password auth
sudo sudo rm -rf /etc/ssh/sshd_config.d/*


## write known good SSH key to the authorized_keys file. REPLACE WITH YOUR SSH PUBLIC KEY (.pub file) generated when using ssh-keygen (its contents begin with "ssh-rsa AAAAB3...")

sudo echo "ssh-rsa [key]= [usr]@[domain/hostname]" >>  /etc/ssh/authorized_keys

## Lock the root account
passwd -l root